RabbitMQ基础及其集群搭建
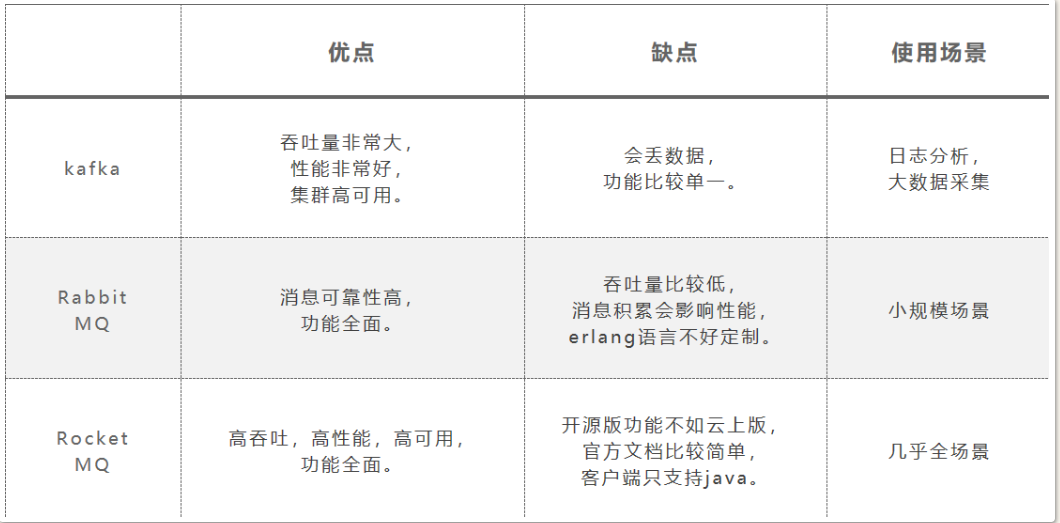
1. 对比
2. 安装
2.1. 环境
2.1.1. 虚拟机
3台Ubuntu机器做集群, ip地址: 192.168.211.111~113
2.1.2. Erlang
1root@clustertest01:/home/gang/soft# apt-get update
2root@clustertest01:/home/gang/soft# apt-get install erlang
3root@clustertest01:/home/gang/soft# erl -version
4Erlang (SMP,ASYNC_THREADS) (BEAM) emulator version 12.2.1
2.1.3. RabbitMQ
1root@clustertest01:/home/gang/soft# apt-get install rabbitmq-server
2Not creating home directory `/var/lib/rabbitmq'.
3Created symlink /etc/systemd/system/multi-user.target.wants/rabbitmq-server.service → /lib/systemd/system/rabbitmq-server.service.
4
5
6
7root@clustertest01:/home/gang/soft# service rabbitmq-server status
开启后台界面
 1root@clustertest01:/home/gang/soft# rabbitmq-plugins enable rabbitmq_management
 2Enabling plugins on node rabbit@clustertest01:
 3rabbitmq_management
 4The following plugins have been configured:
 5  rabbitmq_management
 6  rabbitmq_management_agent
 7  rabbitmq_web_dispatch
 8Applying plugin configuration to rabbit@clustertest01...
 9The following plugins have been enabled:
10  rabbitmq_management
11  rabbitmq_management_agent
12  rabbitmq_web_dispatch
新增用户并赋予admin权限
1root@clustertest01:/home/gang/soft# rabbitmqctl add_user gang 123456
2Adding user "gang" ...
3Done. Don't forget to grant the user permissions to some virtual hosts! See 'rabbitmqctl help set_permissions' to learn more.
4root@clustertest01:/home/gang/soft# rabbitmqctl set_user_tags gang administrator
5Setting tags for user "gang" to [administrator] ...
进入地址: http://192.168.211.111:15672/#/, 即可登录管理界面

2.2. 集群模式
2.2.1. 普通集群特点
-
默认模式
-
集群中个节点之间有相同的元数据, 即队列结构; 而消息不会冗余, 只会存在一个节点中
-
宕机重启后可能出现消息重复消费
-
不支持高可用, 挂了需要手动重启?
2.2.2. 镜像集群特点
- 是普通集群的增强
- 主动同步镜像节点消息, 每个节点上存放着全量消息
- 有master和slave
- 镜像同步会占用大量的带宽, 所以队列数量最好不要太多
2.3. 普通集群搭建
 1# 同步.erlang.cookie, 注意同步过来的文件权限
 2cd /var/lib/rabbitmq
 3chown rabbitmq:rabbitmq .erlang.cookie
 4
 5
 6# clustertest02 以内存的方式加入集群
 7root@clustertest02:/home/gang# rabbitmqctl join_cluster --ram rabbit@clustertest01
 8
 9# 加入之前需要先停止当前节点
10root@clustertest02:/home/gang# rabbitmqctl join_cluster --ram rabbit@clustertest01
11Error: this command requires the 'rabbit' app to be stopped on the target node. Stop it with 'rabbitmqctl stop_app'.
12Arguments given:
13	join_cluster --ram rabbit@clustertest01
14
15
16# clustertest03 以磁盘的方式加入集群
17root@clustertest03:/home/gang# rabbitmqctl join_cluster rabbit@clustertest01
18
19
20# 打开两个节点的 rabbitmq_management, 要不然在cluster01上无法看到
21rabbitmq-plugins enable rabbitmq_management
2.4. 镜像集群搭建
1# 创建一个虚拟机, 然后添加镜像策略
2rabbitmqctl add_vhost /mirror
3
4rabbitmqctl set_policy ha-all --vhost "/mirror" "^" '{"ha-mode":"all"}'
2.4.1. HA Mode
-
all
- 队列镜像同步到集群中的所有节点, 新加入的集群也会被同步到
-
exactly
- 需要搭配一个数字类型的参数
- 队列镜像到集群中指定数量的节点
- 如果集群内节点数少于这个数字,则队列镜像到集群内的所有节点
- 如果集群内节点少于这个数,当一个包含镜像的节点停止服务后,新的镜像就不会去另外找节点进行镜像备份
-
nodes
- 需要搭配一个字符串类型的参数
- 将队列镜像到指定节点上

3. 一些概念
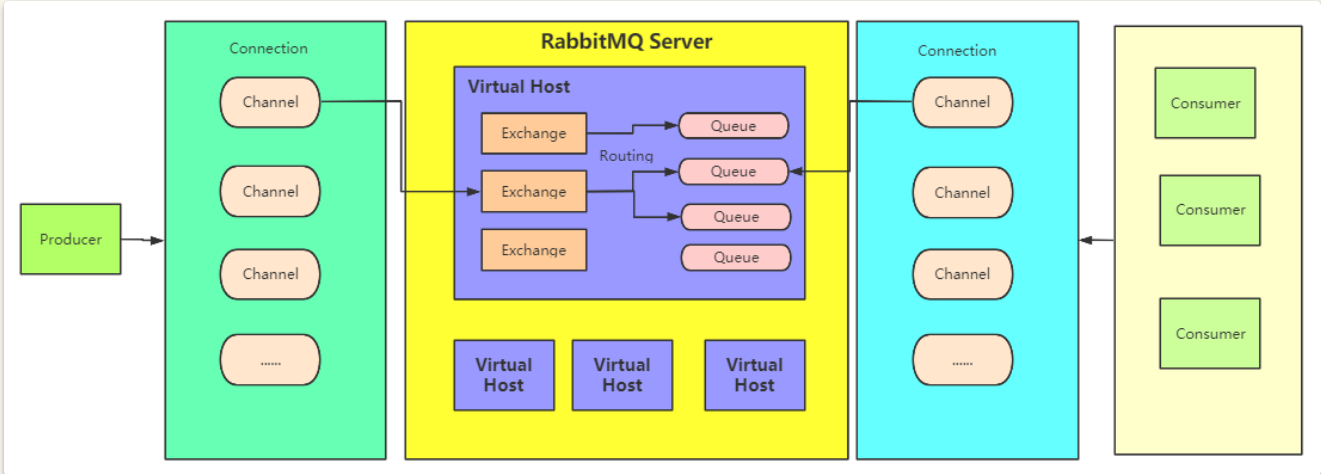
3.1. 虚拟主机(Virtual Host)
- 一个RabbitMQ集群中划分出多个虚拟主机,每一个虚拟主机都有AMQP的全套基础组件,并且可以针对每个虚拟主机进行权限以及数据分配
- 不同虚拟主机之间是完全隔离的
3.2. 连接(Connection)
- 客户端与RabbitM建立一个TCP连接,就是Connection
3.3. 信道(Channel)
- 客户端与RabbitMQ建立连接之后, 就会创建一个AMQP的Channel, 每个Channel都会有一个唯一的ID
- 一个Connection中可以有多个Channel
- Connection中的Channel需要根据情况分配
3.4. 交换机(Exchange)
- 消息发到RabbitMQ之后, 首先会进入交换机, 再由交换机转发给不同的队列
- 不同的交换机有不同的路由策略
- 多与生产者打交道
3.5. 队列(Queue)
- 保存数据的最小单位
- 有如下类型:
Classic,Quiorum,.Stream
3.5.1. Classic

参数:
- Durability: 是否持久化
- Durable: 消息落盘, io增加
- Transient
- Auto delete: 是否自动删除
- yes: 如果没有消费者连接自己了, 就会自动删除, pulsar也有这个选项
- no
3.5.2. Quorum 仲裁队列
关于Quorum的详细介绍见 https://www.rabbitmq.com/quorum-queues.html
仲裁队列是RabbitMQ 3.8版中引入的一种队列类型。与传统的镜像队列(Mirrored Queues)相比,仲裁队列使用Raft一致性算法来确保数据的高可用性和一致性。它们在设计上解决了镜像队列的一些缺陷,如网络分区处理和一致性问题。
特点:
- 高可用性:使用Raft一致性算法,确保即使在节点故障的情况下,数据也能保持一致性和可用性。
- 强一致性:所有写操作(消息发布)必须经过多数节点(即多数派)的确认,这保证了数据的一致性。
- 容错性:支持节点失效和恢复,能在网络分区和节点宕机的情况下继续运行。
- 动态扩展:可以动态添加和删除节点,而不会中断队列的正常运行
原理:
仲裁队列使用Raft一致性算法来管理队列中的消息, 确保在多个节点间的一致性。以下是其关键组件和工作流程:
- 领导者(Leader):仲裁队列中的一个节点会被选举为领导者,负责处理所有写请求和协调其他节点的状态。
- 追随者(Follower):其余节点作为追随者,复制领导者的状态和日志条目。
- 日志复制:当客户端发布消息时,领导者将消息记录到其日志中,并将日志条目复制到大多数追随者。只有在大多数追随者确认日志条目后,消息才会被认为是已提交并对客户端可见。
- 节点故障处理:如果领导者节点发生故障,会自动选举新的领导者,继续处理未完成的操作。
3.5.3. Stream队列
-
消息持久化到磁盘, 分布式备份, 官方推荐的, 适合消费者多, 读消息频繁的场景。
-
Stream队列的核心是以append-only的方式记录日志消息,
-
通过调整消费者的消费进度offset来实现消息的多次分发
特点:
-
large fan-outs 大规模分发
Stream队列允许任意数量的消费者使用同一个队列的消息,从而消除绑定多个队列的需求。
-
Replay/Time-travelling 消息回溯
RabbitMQ的其他队列在消费者确认处理完消息之后, 就会将消息从队列中删除。而Stream队列允许消费者在日志的任何一个位置开始重新读取
-
Throughput Performance 高吞吐性能
-
Large logs 大日志
4. 基础操作
4.1. 原生API
4.1.1. 添加依赖
1<dependency>
2    <groupId>com.rabbitmq</groupId>
3    <artifactId>amqp-client</artifactId>
4    <version>5.9.0</version>
5</dependency>
-
创建队列
1ConnectionFactory factory = new ConnectionFactory(); 2factory.setHost("localhost"); 3 4connection = factory.newConnection(); 5channel = connection.createChannel(); -
声明队列
1channel.queueDeclare(String queue, boolean durable, boolean exclusive, boolean autoDelete, Map<String, Object> arguments);参数说明:
- queue:队列的名字
- durable true if we are declaring a durable queue (the queue will survive a server restart)
- exclusive true if we are declaring an exclusive queue (restricted to this connection)
- autoDelete true if we are declaring an autodelete queue (server will delete it when no longer in use)
- arguments other properties (construction arguments) for the queue
如果要声明一个
Quorum队列,则只需要在后面的arguments中传入一个参数,x-queue-type,参数值设定为quorum。1Map<String,Object> params = new HashMap<>(); 2params.put("x-queue-type","quorum"); 3//声明Quorum队列的方式就是添加一个x-queue-type参数,指定为quorum。默认是classic 4channel.queueDeclare(QUEUE_NAME, true, false, false, params);注意:1、对于
Quorum类型,durable参数就必须是true了,设置成false的话,会报错。同样,exclusive参数必须设置为false如果要声明一个
Stream队列,则x-queue-type参数要设置为 stream .1 Map<String,Object> params = new HashMap<>(); 2 params.put("x-queue-type","stream"); 3 params.put("x-max-length-bytes", 20_000_000_000L); // maximum stream size: 20 GB 4 params.put("x-stream-max-segment-size-bytes", 100_000_000); // size of segment files: 100 MB 5 channel.queueDeclare(QUEUE_NAME, true, false, false, params);注意:
-
同样,durable参数必须是true,exclusive必须是false。
-
x-max-length-bytes表示日志文件的最大字节数。x-stream-max-segment-size-bytes每一个日志文件的最大大小
声明的队列,如果服务端没有,那么会自动创建。但是如果服务端有了这个队列,那么声明的队列属性必须和服务端的队列属性一致才行。
-
Producer发送消息到queue
1channel.basicPublish(String exchange, String routingKey, BasicProperties props,message.getBytes("UTF-8"));参数说明:
- exchange the exchange to publish the message to
- routingKey the routing key
- props other properties for the message - routing headers etc
- body the message body
-
Consumer消费消息
消费方式:
-
被动消费: 等待mq主动把消息推送过来
1channel.basicConsume(String queue, boolean autoAck, Consumer callback);参数说明:
- queue the name of the queue
- autoAck true if the server should consider messages acknowledged once delivered; false if the server should expect explicit acknowledgements
- callback an interface to the consumer object
-
主动消费:主动去mq上获取指定的msg消费
1GetResponse response = channel.basicGet(QUEUE_NAME, boolean autoAck);参数说明:
- queue the name of the queue
- autoAck true if the server should consider messages acknowledged once delivered; false if the server should expect explicit acknowledgements
-
Stream队列消费
- channel必须设置basicQos属性。
- 正确声明Stream队列。
- 消费时需要指定offset。
1//3、消费时,必须指定offset。 可选的值:
2// first: 从日志队列中第一个可消费的消息开始消费
3// last: 消费消息日志中最后一个消息
4// next: 相当于不指定offset,消费不到消息。
5// Offset: 一个数字型的偏移量
6// Timestamp:一个代表时间的Data类型变量,表示从这个时间点开始消费。例如 一个小时前 Date timestamp = new Date(System.currentTimeMillis() - 60 * 60 * 1_000)
7Map<String,Object> consumeParam = new HashMap<>();
8consumeParam.put("x-stream-offset","next");
9channel.basicConsume(QUEUE_NAME, false,consumeParam, myconsumer);
-
-
关闭Channel
1 channel.close();
4.2. 发送消息
不分代码如下:
 1public static void main(String[] args) throws Exception {
 2    Connection connection = RabbitMQUtil.getConnection();
 3    Channel channel = connection.createChannel();
 4    //声明队列会在服务端自动创建。
 5    channel.queueDeclare(QUEUE_NAME, false, false, false, null);
 6
 7    String message = "Hello World!333";
 8
 9    AMQP.BasicProperties.Builder builder = new AMQP.BasicProperties.Builder();
10    builder.deliveryMode(MessageProperties.PERSISTENT_TEXT_PLAIN.getDeliveryMode());
11    builder.priority(MessageProperties.PERSISTENT_TEXT_PLAIN.getPriority());
12    //携带消息ID
13    builder.messageId(""+channel.getNextPublishSeqNo());
14    Map<String, Object> headers = new HashMap<>();
15    //携带订单号
16    headers.put("order", "123");
17    builder.headers(headers);
18
19    channel.basicPublish("", QUEUE_NAME, builder.build(), message.getBytes("UTF-8"));
20    System.out.println(" [x] Sent '" + message + "'");
21
22    channel.close();
23    connection.close();
24}
25
26
27public class RabbitMQUtil {
28
29	private static Connection connection;
30	private static final String HOST_NAME="192.168.211.111";
31	private static final int HOST_PORT=5672;
32
33	public static final String QUEUE_HELLO="hello";
34	public static final String QUEUE_WORK="work";
35	public static final String QUEUE_PUBLISH="publish";
36
37	private RabbitMQUtil() {}
38
39	public static Connection getConnection() throws Exception {
40		if(null == connection) {
41			ConnectionFactory factory = new ConnectionFactory();
42			factory.setHost(HOST_NAME);
43			factory.setPort(HOST_PORT);
44			factory.setUsername("gang");
45			factory.setPassword("123456");
46			factory.setVirtualHost("/mirror");
47			connection = factory.newConnection();
48		}
49		return connection;
50	}
51}
需要再后台设置好用户对应虚拟机(vhost)的权限, 要不然会报错

4.3. 消息模型
4.3.1. 简单队列模型(Simple Queue)
这是最基本的消息模型,包含一个生产者、一个队列和一个消费者。生产者将消息发送到队列,消费者从队列中接收并处理消息。
示例:
- 生产者发送消息到队列
simple_queue。 - 消费者从队列
simple_queue中接收消息。
4.3.2. 工作队列模型(Work Queue)
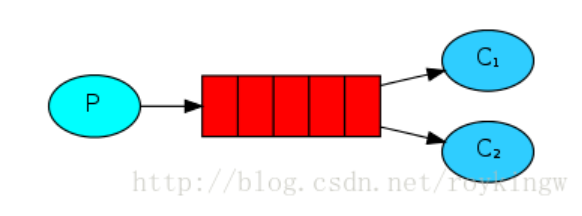
工作队列模型用来分发耗时任务。一个生产者将任务分发到队列,多个消费者从队列中获取任务,分担工作负载。这种模型帮助我们实现负载均衡。
示例:
- 生产者发送任务消息到队列
work_queue。 - 多个消费者从队列
work_queue中接收任务并处理。
1// Producer
2channel.queueDeclare(TASK_QUEUE_NAME, true, false, false, null); //任务一般是不能因为消息中间件的服务而被耽误的,所以durable设置成了true,这样,即使rabbitMQ服务断了,这个消息也不会消失
3channel.basicPublish("", TASK_QUEUE_NAME,MessageProperties.PERSISTENT_TEXT_PLAIN,message.getBytes("UTF-8"));
4
5// Consumer
6channel.queueDeclare(TASK_QUEUE_NAME, true, false, false, null);
7channel.basicQos(1);
8channel.basicConsume(TASK_QUEUE_NAME, false, consumer);
这个模式应该是最常用的模式,也是官网讨论比较详细的一种模式,所以官网上也对这种模式做了重点讲述。
注意:
- Consumer端的autoAck为false, 这样即使Consumer在执行message过程中出问题了, 也不会导致消息丢失,因为没有ack的message会被服务器重新进行投递。
- 消息的持久性;queue一旦被定义了,就无法再次修改了
- 分发给Consumer消息的方式
- 默认是fair dispatch, 也就是round robin
- Consumer会向服务器上报一个prefetchCount, 表示自己预处理能力值, 若下发的时候超过了这个值,则不会向该Consumer再次下发
4.3.3. 发布/订阅模型(Publish/Subscribe)

在发布/订阅模型中,消息被发送到交换机(Exchange),然后交换机将消息分发到绑定到它的多个队列中。这种模型适用于广播消息的场景。
示例:
- 生产者将消息发送到交换机
logs_exchange。 - 交换机将消息分发到所有绑定到它的队列
queue1、queue2等。
1// Producer 只负责向Exchange中发送消息,后面的事情不管
2channel.exchangeDeclare(EXCHANGE_NAME, "fanout");
3channel.basicPublish(EXCHANGE_NAME, "", null, message.getBytes("UTF-8"));
4
5// Receiver 将消费的目标队列绑定到Exchange上
6channel.exchangeDeclare(EXCHANGE_NAME, "fanout");
7String queueName = channel.queueDeclare().getQueue();
8channel.queueBind(queueName, EXCHANGE_NAME, "");
关键处就是type为”fanout” 的Exchange,这种类型的Exchange只负责往所有已绑定的队列上发送消息
4.3.4. 路由模型(Routing)
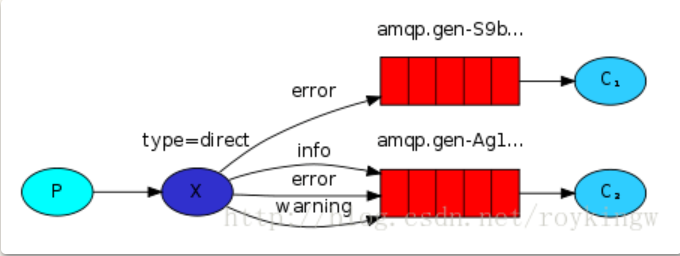
路由模型是发布/订阅模型的扩展,消息根据路由键(Routing Key)被发送到不同的队列。交换机类型为 direct。
示例:
- 生产者将消息发送到交换机
direct_logs_exchange,并指定路由键info、warning或error。 - 交换机会将消息分发到绑定了相应路由键的队列。
1// Producer
2channel.exchangeDeclare(EXCHANGE_NAME, "direct");
3channel.basicPublish(EXCHANGE_NAME, routingKey, null, message.getBytes("UTF-8"));
4
5// Consumer
6channel.exchangeDeclare(EXCHANGE_NAME, "direct");
7channel.queueBind(queueName, EXCHANGE_NAME, routingKey1);
8channel.queueBind(queueName, EXCHANGE_NAME, routingKey2);
9channel.basicConsume(queueName, true, consumer);
4.3.5. 主题模型(Topics)
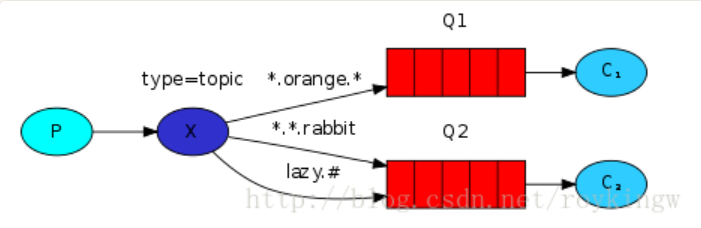
主题模型也是发布/订阅模型的扩展,允许使用模式匹配的路由键,将消息分发到绑定了匹配模式的队列。交换机类型为 topic。
示例:
- 生产者将消息发送到交换机
topic_logs_exchange,并指定路由键kern.critical、app.info等。 - 交换机会根据绑定的模式(如
kern.*或*.info)将消息分发到匹配的队列。
1// Producer
2channel.exchangeDeclare(EXCHANGE_NAME, "topic");
3channel.basicPublish(EXCHANGE_NAME, routingKey, null, message.getBytes("UTF-8"));
4
5// Receiver
6channel.exchangeDeclare(EXCHANGE_NAME, "topic");
7channel.queueBind(queueName, EXCHANGE_NAME, routingKey1);
8channel.queueBind(queueName, EXCHANGE_NAME, routingKey2);
9channel.basicConsume(queueName, true, consumer);
4.3.6. RPC(Remote Procedure Call)
RPC 模型允许在分布式系统中实现同步的远程过程调用。客户端发送请求消息到队列,服务器从队列中接收并处理请求,然后将响应消息发送回客户端。
示例:
- 客户端将请求消息发送到队列
rpc_queue,并指定一个回调队列reply_queue。 - 服务器从
rpc_queue接收请求消息,处理后将结果发送到reply_queue。
用的比较少。
4.3.7. Publisher Confirms
Publisher Confirms 是一种用于确认消息已经被 RabbitMQ 服务器成功接收和处理的机制。在生产者发送消息之后,RabbitMQ 会异步地返回一个确认(ack)或未确认(nack)信号,以通知生产者消息的处理状态。这种机制非常适合需要高可靠性和确保消息不丢失的场景。
-
该模式默认不开启,需要手动声明
1channel.confirmSelect();-
发布单条消息
1for (int i = 0; i < MESSAGE_COUNT; i++) { 2 String body = String.valueOf(i); 3 channel.basicPublish("", queue, null, body.getBytes()); 4 // 该方法会阻塞channel 5 channel.waitForConfirmsOrDie(5_000); 6} -
发送批量消息
1int batchSize = 100; 2int outstandingMessageCount = 0; 3 4long start = System.nanoTime(); 5for (int i = 0; i < MESSAGE_COUNT; i++) { 6 String body = String.valueOf(i); 7 ch.basicPublish("", queue, null, body.getBytes()); 8 outstandingMessageCount++; 9 10 if (outstandingMessageCount == batchSize) { 11 ch.waitForConfirmsOrDie(5_000); 12 outstandingMessageCount = 0; 13 } 14} 15 16if (outstandingMessageCount > 0) { 17 ch.waitForConfirmsOrDie(5_000); 18} -
异步确认
1channel.addConfirmListener(ConfirmCallback var1, ConfirmCallback var2);- 发送者在发送万消息后就会调用第一个callback
- 等服务端反馈后,在执行第二个callback
-